
Turn a technical plan into a listing anyone can understand.
Show buyers who can't read a floor plan what the space actually looks like: a 3D floor plan generated straight from a 2D plan, completing the photo set.
 Listing output
 Interior listing
 Listing variation
Buyers see the home, not the plan
A furnished 3D floor plan instead of a dimensioned technical drawing: the layout reads instantly.
The missing piece of the photo set
Photos show the current state; the 3D plan explains the full layout — together they complete the listing.
Repeatable across the whole portfolio
Reproduce the same format and style in minutes for every new listing.
The Story of One Listing
Sketch in hand, listing live ten minutes later.
A new listing comes in: an apartment a few years old, you have the title deed sketch but the technical drawing doesn't tell the buyer much. Photos are taken, but it's hard to work out the relationship between rooms — where the hallway leads — from the photo set alone.
You scan and upload the sketch, along with an instruction asking the room names and square-meter labels to be preserved. In a short time, you have a furnished, top-down 3D floor plan in hand. You add it to the front of the photo set as the listing's clearest frame.
On the next listing, you repeat the same format — same angle, same furniture language, same palette. Over time your listings carry the same visual signature; buyers start to recognize your portfolio from the rest.
Example Outputs
Sample frames from this workflow.
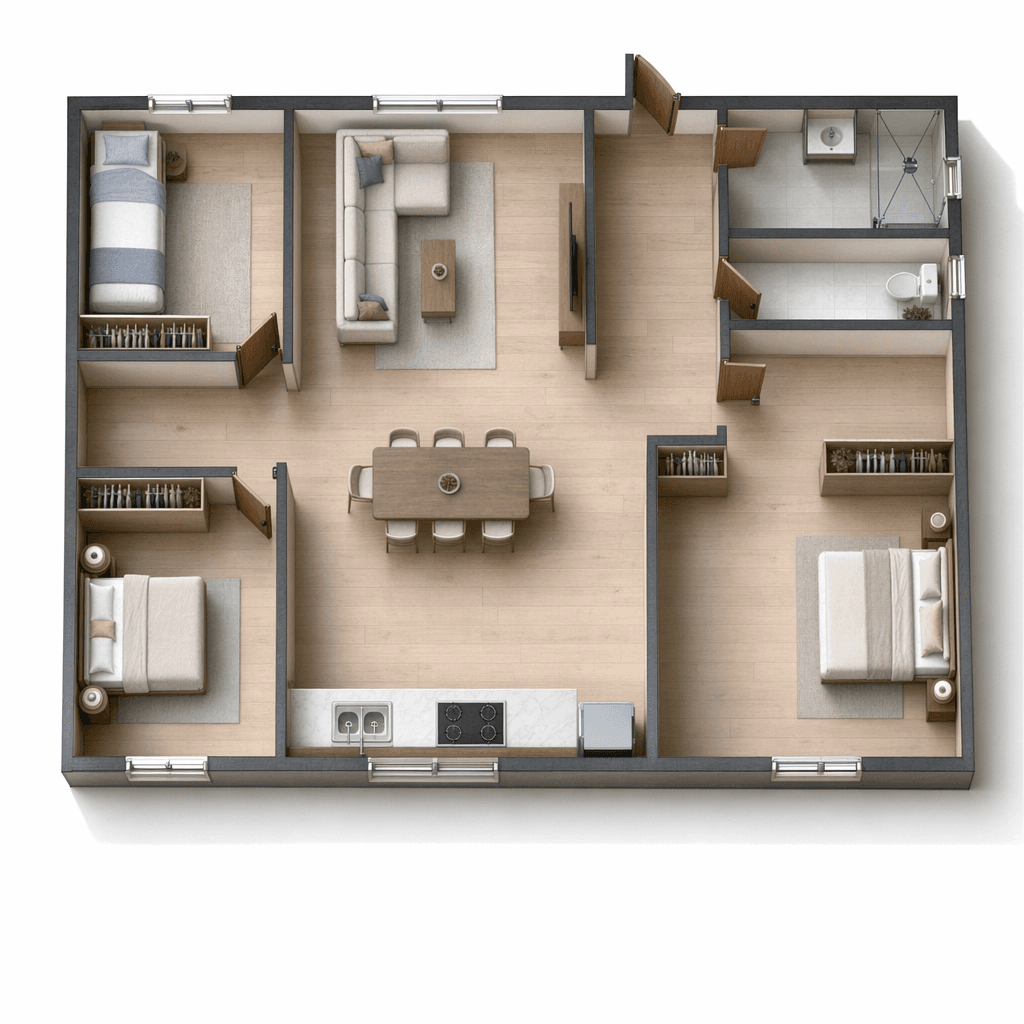
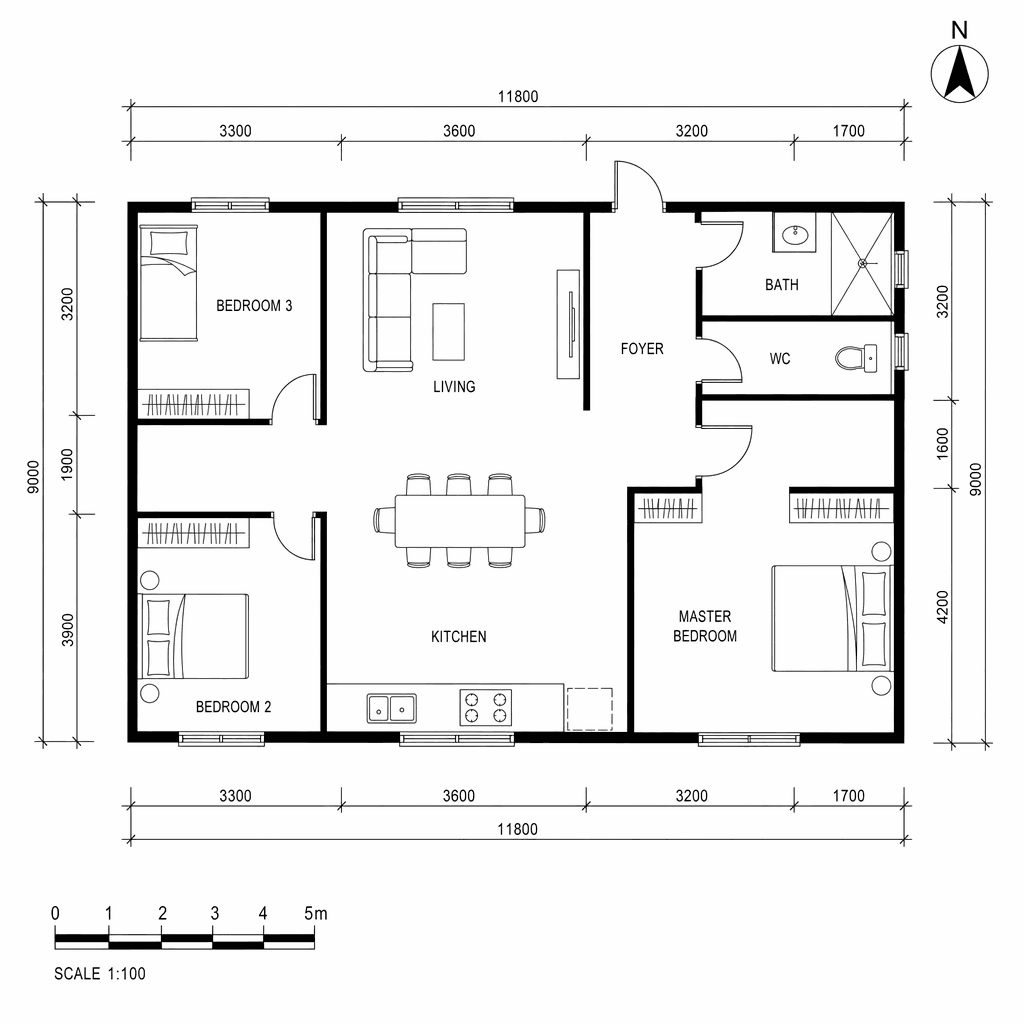
A flat plan turned into a furnished, listing-ready top-down render.
Interior listingListing variationPlatform visualHow It Works
From brief to output in three steps.
- 01
Upload the plan
Add the listing's 2D plan or sketch; note room uses briefly.
Input: 2D plan, Portfolio notes, Space type information, Listing channel or target audience
- 02
Turn it into a visual
The plan becomes a furnished 3D perspective buyers grasp at a glance.
- 03
Add it to the listing
Place the output next to the photo set; repeat the same format across the rest of the portfolio.
Output: 3D floor plan output, A visual set that supports the listing narrative, A cleaner, repeatable listing presentation
In Depth
3 rules for generating a 3D plan for a listing
The top-down logic that preserves plan legibility
A top-down angle with no perspective distortion reads more clearly than an isometric or angled render, because room proportions and furniture placement stay closest to the actual plan.
Use a phrase like "top-down view, no perspective distortion" in the prompt to lock this angle in — otherwise the model may choose its own camera angle.
Preserve labels and measurements — don't verify them
Room names and square-meter values are carried into the output exactly with a preservation instruction, but the model doesn't verify or correct these values — the numbers on the source plan need to already be correct.
Making clear that the listing shows a visual representation, not a guarantee of measurements, is a good legal and ethical habit.
Use one format across the portfolio
Reusing the same style sentence (flooring material, furniture language, lighting) on every new listing makes your portfolio look like it came from a single hand.
Write the pattern that works once and save it; change only the input image for each new plan.
Prompt Patterns
Copy, paste, try it.
From a title deed sketch to a 3D plan
You have an old, black-and-white title deed sketch, and the listing needs a colored, furnished visual.
Convert this 2D floor plan drawing into a furnished, top-down 3D floor plan render with no perspective distortion. Keep room layout, wall positions, door and window placements identical to the source plan. Preserve all room name labels and square meter text exactly as written. Use light warm oak flooring, soft neutral furniture, gentle daylight.
Without a preservation clause, the model may reinterpret room proportions.
Empty / furnished comparison
You want to show the buyer both the empty and furnished versions.
Generate the same top-down 3D floor plan without any furniture: empty rooms, visible flooring material, walls, doors, and windows unchanged, room labels and square meter text preserved exactly.
Use the same input with the previous pattern for the furnished version.
Locking a portfolio style
You want to use the same visual language across different listings.
Convert this floor plan into a 3D render matching our previous listings' style: light oak flooring, cream walls, gray textile furniture, soft daylight, top-down camera with no distortion. Keep room layout and all labels identical to the source plan.
Write the style sentence once and reuse it exactly on every new listing.
Comparison
How it differs from classic listing prep
| Step | Classic workflow | With Syntina |
|---|---|---|
| Listing prep | Photo set only, weak plan storytelling | Photos plus a furnished 3D floor plan together |
| Plan legibility | Interpreting the technical drawing is left to the buyer | A space that reads instantly with furniture and proportions |
| Production time | A professional 3D drawing can take days | A visual from a sketch or plan in minutes |
| Portfolio consistency | Every listing prepared in a different visual language | The same format and style repeated on every listing |
| Cost scale | Outside rendering services billed per listing | Credit-based, scales with listing volume |
Scenarios
Where it's used in the field.
- For-sale and rental listings
- Luxury property marketing
- Portfolio presentations
Final Check
Before it goes into the listing
- Is the sketch or plan legible enough?
A blurry scan or an angled photo widens the model's margin for guesswork.
- Is the room layout locked with a preservation clause?
Add an instruction like "keep the room layout, walls, doors, and window positions the same."
- Are the square-meter and room labels correct?
The model preserves labels but doesn't verify them — the values on the source plan need to already be correct.
- Did you add an "example layout" note?
Furniture placement is a suggestion; this should be made clear in the listing.
- Is it in the same style as the rest of your portfolio?
The same angle and palette repeated makes your profile recognizable.
FAQ
Frequently asked questions
- Which listing types benefit most?
- Residential and new-development listings where plan storytelling matters see the clearest benefit.
- Does a 3D plan replace the photo set?
- No. It's an additional asset that completes the photo set and makes the plan easier to read.
- Can a 3D plan be generated from a sketch or hand drawing?
- Yes. A legible sketch or hand drawing can also be a starting input; cleaner lines improve the result.
- How is credit cost calculated per listing?
- Every generation deducts credits from your balance based on the model you choose; cost per listing varies by model and resolution. You can see the current table on the pricing page.
- Is the title deed sketch or plan I upload used anywhere else?
- The plan you upload is processed only for the generation you request; infrastructure providers such as fal.ai and BytePlus/ModelArk may be used in that process. Details are in our privacy policy.
- Can I get output at a resolution suitable for uploading to a listing site?
- Yes, output comes at a resolution suitable for most listing sites and social media formats; for larger print needs, you can use the upscaling step.
This workflow explains the plan — it doesn't replace the photo
A 3D floor plan doesn't replace real photos; it explains the layout logic on the plan, not the actual current condition of the space. In a listing, the two should be presented together as complementary layers of information.
For luxury property or project-scale listings that need a broader visual language (facade, common areas, atmosphere), this workflow can be paired with the exterior and concept visualization pages.